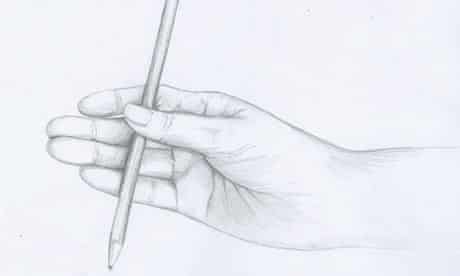
How to Hold Pencil for Figure Drawing
The activity of writing is largely responsible for the way we hold and manipulate mark-making implements (pens, pencils etc). Being asked to hold the drawing instrument differently might seem strange at first, but with practice it will provide a different quality of mark, and should be seen as a positive and exciting element of choice in the language of drawing.
Between your thumb and forefinger
The most common way to hold a pencil (see above). As this grip is familiar, you'll find that your marks can be finely controlled by your supporting fingers. With this level of control, you might find it the ideal grip for sensitive, detailed mark-making. You will find that the upright position of the pencil forces you to naturally use the tip of the pencil rather than the side, but try tipping it to different angles - pushing it forward and back and from side to side - exploring the tip and its possibilities.

Across your four figures
With the pencil laid across the four figures, braced lightly with the flat of the thumb, you'll find a loose, relaxed, comfortable grip that encourages you to make expressive marks. You'll also find that this grip naturally encourages you to use the side of the pencil, rather than the point. Experiment: spin and twist the pencils to discover a variety of mark-making.
Marks from the wrist
These tend to be small, controlled marks that are made with the support of the ball of the hand resting on the drawing.
Marks from the elbow
These tend to be longer and more fluent. They are often made in arcs from the elbow without the hand resting on the drawing.
Marks from the shoulder
These are more fluent still, and often linear. There is a tendency for less control to occur, which can be an advantage. Remember, there are no right or wrong ways to hold your pencil when drawing, but you shouldn't force yourself to use an "unnatural" grip. The grips recommended in the following exercises are for guidance only and you can always adapt the grip slightly so that it feels comfortable for you.
Choosing and lighting your subject
Nature still provides the most interesting objects for a drawer to practice their skills on. A Coca-Cola bottle is a Coca-Cola bottle is a Coca-Cola bottle: machine-made and symmetrical with a hard and complex shiny surface. By comparison, no two trees or apples are the same. If possible choose "organic" objects that give license to make mistakes without them being apparent - natural or soft, handmade, worn objects allow your drawing to be freed from the inhibiting need of having to make it absolutely "correct".
For these exercises, you should choose several objects that offer qualities of difference within themselves. So, empty/busy areas, detailed/plain areas, awkward angles/flowing lines, texture/smoothness etc.
As you begin to develop your looking skills, your sensitivity to light will become increasingly acute. Before beginning a drawing, part of your preparation should be to take a few minutes to consider the light source.
Natural light: If possible have a single source of light, (perhaps from a window), by which you can see both the objects and your drawing. Remember that if you are drawing in daylight, the amount and direction of light will change throughout the day.
Artificial light: Drawing in artificial light (under an Anglepoise lamp, for example) will produce a more constant, directional light and will therefore allow you to return to it at a later date. Being able to select and control the consistency of light is probably the most ideal position to be in.
How to Hold Pencil for Figure Drawing
Source: https://www.theguardian.com/artanddesign/2009/sep/19/drawing-guide-pencil-grips
0 Response to "How to Hold Pencil for Figure Drawing"
Post a Comment